In this new quick tip you will learn how to create a simple seashell in Adobe Illustrator.
You will begin with the shape of the seashell which is made using basic shapes, the Rotate option and the Pathfinder panel. To add more depth, you will add two types of shading and also highlights on the surface of the seashell.
At the end, you will color the seashells using different gradients and add the shadows. Let’s begin!
1. Start a New Project
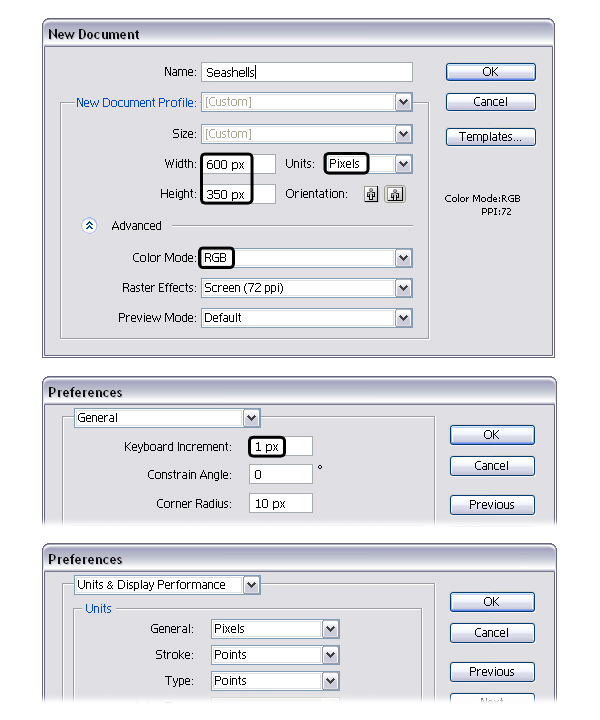
Launch Illustrator and go to File > New in order to open a blank document.Type a name and set up the dimensions then select Pixels as Units and RGB as Color Mode. Next, go to Edit > Preferences > General and set the Keyboard Increment to 1px then go to Units & Display Performance and make sure that the Units are as indicated. I usually work with these settings and they will help you throughout the drawing process.
2. Create the Shape of the Seashell
Step 1
Grab the Rectangle Tool (M) and draw a 2 x 97px rectangle then give it a stroke using the color of your choice. Now, zoom on the top part of the rectangle then grab the Add Anchor Point Tool (+) and use it to add an extra point in the middle as shown in the close-up. Do the same thing at the bottom of the rectangle.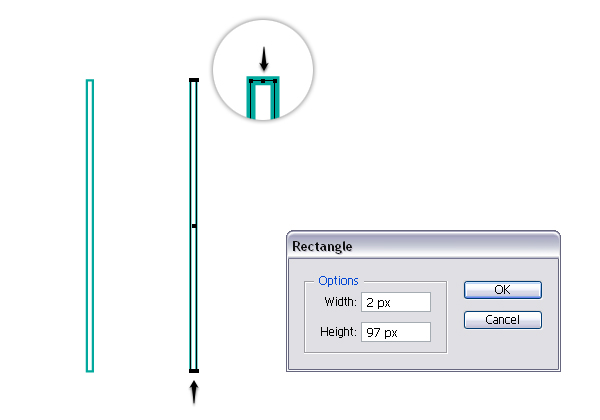
Step 2
Use the Direct Selection Tool (A) to select only the point added earlier and move it upwards 4px by pressing the Up Arrow Key on your keyboard four times. Still having this point selected, press the Convert selected anchor points to smooth icon in the Control panel. Don’t forget about the bottom of the rectangle and repeat the same things.
Step 3
Having your rounded rectangle selected, go to Effect > Warp > Shell Upper. Apply a 2% Horizontal Bend and hit OK.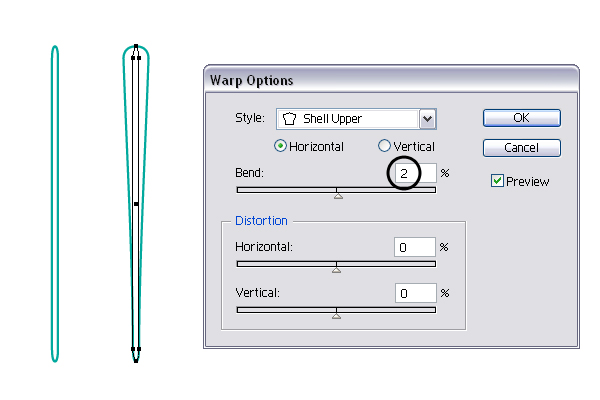
Step 4
In order to expand the effect that you have applied, go to Object menu and select Expand Appearance then Ungroup (Shift-Control-G). I will name the shape obtained “first-rib”. While this shape stays selected, go to Object > Transform > Rotate and select a 5 degrees Angle then hit Copy. You will get a second “rib” on top but you need to move it to the left a little, right next to the first.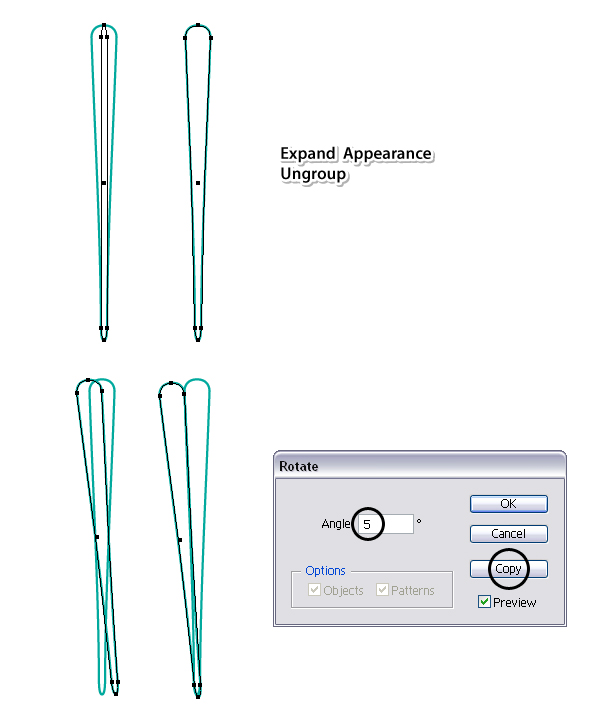
Step 5
Now, select the second “rib” (1) then go to Object > Transform > Rotate, apply again a 5 degrees Angle and hit Copy. You will get the third “rib” (2) that you have to move in the right place, to the left and a little down (3). These ribs must be right next to each other even to overlap a bit but definitely without gaps between them.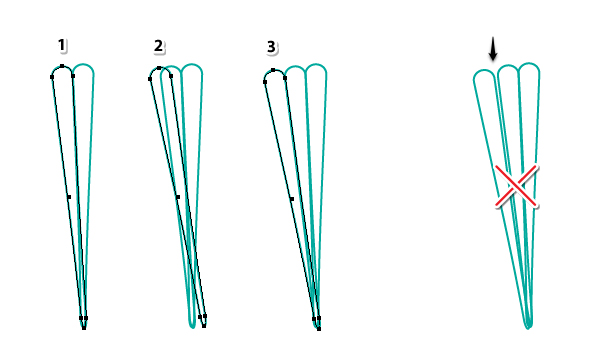
Step 6
You get the point. Now, select the third “rib” and rotate it 5 degrees to get the next one (1). Move it to its place then continue to do the same thing (2). Once you get at the bottom, you can overlap the last few shapes in order to get smaller “ribs” (3). At this point I’ve switched to a green fill so you can see better the shape of the seashell coming together. Don’t worry about the bottom of the seashell because you will fix that later.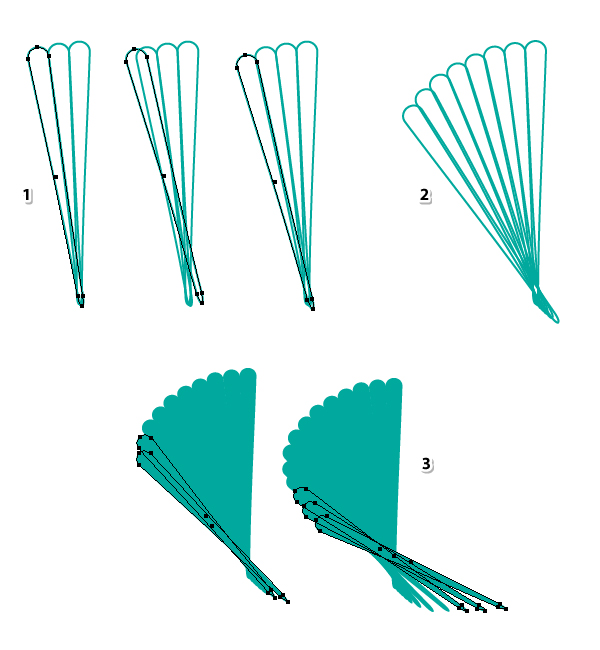
Step 7
Now, select all the shapes from the left side and reflect them to the other side by going to Object > Transform > Reflect. Check Vertical and hit Copy. Make extra adjustments if needed.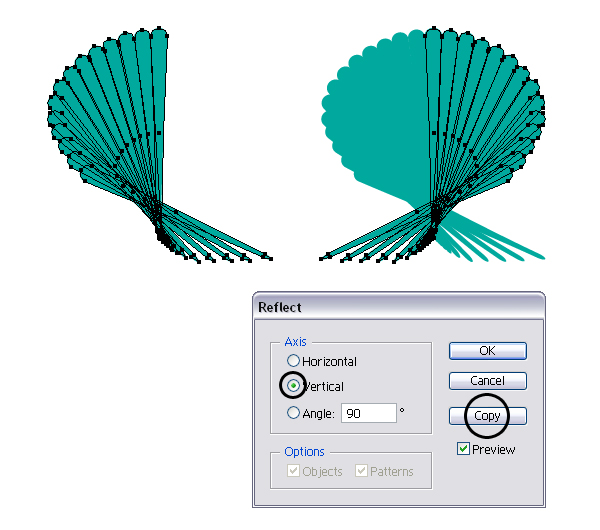
Step 8
Next, select everything and press Add in the Pathfinder panel in order to get a single shape.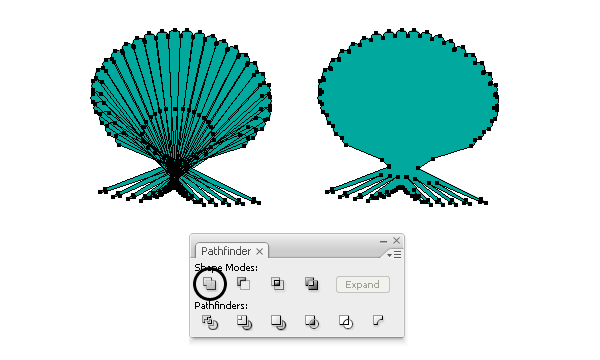
Step 9
Grab the Pen Tool (P) or the Line Segment Tool (\) and draw a straight path as shown in the following image. Select the green shape and the line and press Divide in the Pathfinder panel then Ungroup (Shift-Control-G). Delete the shape at the bottom because you don’t need it.
Step 10
Use the Direct Selection Tool (A) to drag a selection over the points at the bottom of the seashell and press the Convert selected anchor points to smooth icon in the Control panel. This will generate the handles and now you can move them downwards to create the rounded bottom. Now the shape of the seashell is ready.
3. Add Shading on the Seashell
Step 1
Grab the Star Tool and draw a small triangle then switch to the Delete Anchor Point Tool (-) and remove the three points indicated on its sides. Next, use the Direct Selection Tool (A) to select only the bottom point and go to Object > Transform > Move. There, type -64px in the Vertical field and hit OK.
Step 2
Now, take the Pen Tool (P) and draw a rhombus like shape at the top as in the next image (1). Select both shapes and press Add in the Pathfinder panel in order to create a single shape (2). Use the Convert Anchor Point Tool (Shift-C) to transform the two inner points indicated in the close-up from corner to smooth (3). You need that area to be rounded but everything will make sense in the following steps. I will name this shape “light-shading-shape”.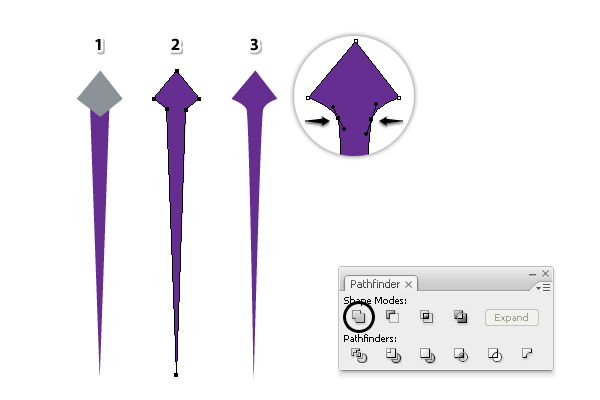
Step 3
Move the shape that you have obtained at the previous step over the seashell and arrange it right between the “ribs”. The rounded area that I’ve talked about earlier should partially cover the top part of the “ribs” as in the close-up. I’ve set the Opacity of the light-shading-shape to 50% so you can see exactly where they overlap but you don’t have to, it’s just for visual purposes.Next, make a copy of this shape then rotate slightly and arrange it between the next two “ribs”.

Step 4
Continue to make more copies of the light-shading-shape, rotate accordingly and arrange them between the “ribs”. After the left side of the seashell is done (1) you can do the same thing on the right side (2).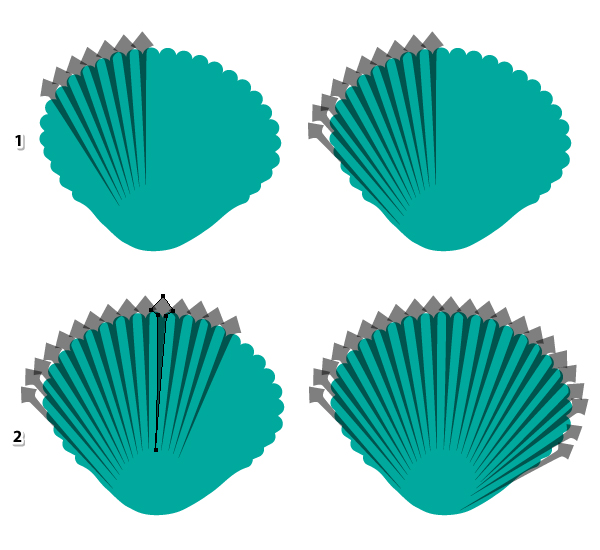
Step 5
At this point, use the Direct Selection Tool (A) to select the end point of one of the shapes and you can make it a little shorter or a little longer. Repeat with the rest. The goal here is that the light-shading-shapes to have different lengths at the bottom.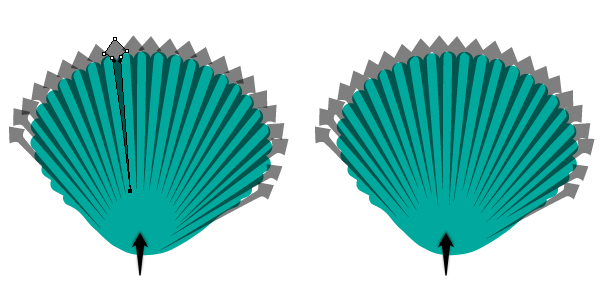
Step 6
The Opacity is set back to 100% now. Copy and Paste in Front (Control-F) the seashell then select all light-shading-shapes and Group (Control-G) them (1). Before you continue make a copy of this group because you will need it at the next step. Now, select the group of shapes along with the copy of the seashell and press Intersect in the Pathfinder panel (2). Set the resulting shape to Blending mode Overlay and 25% Opacity while having a black fill (3).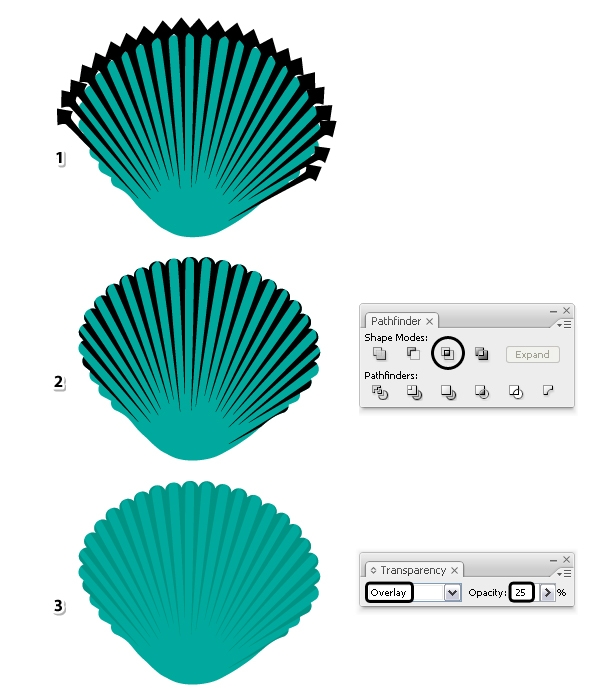
Step 7
The light shading is done but we need more depth. Grab the copy of the group that you’ve made at the previous step and move it in front of everything. Ungroup (Shift-Control-G) them first then select one of the shapes with the Selection Tool (1) and make it thinner by squeezing the bounding box (2). You can see the end result in the third close-up.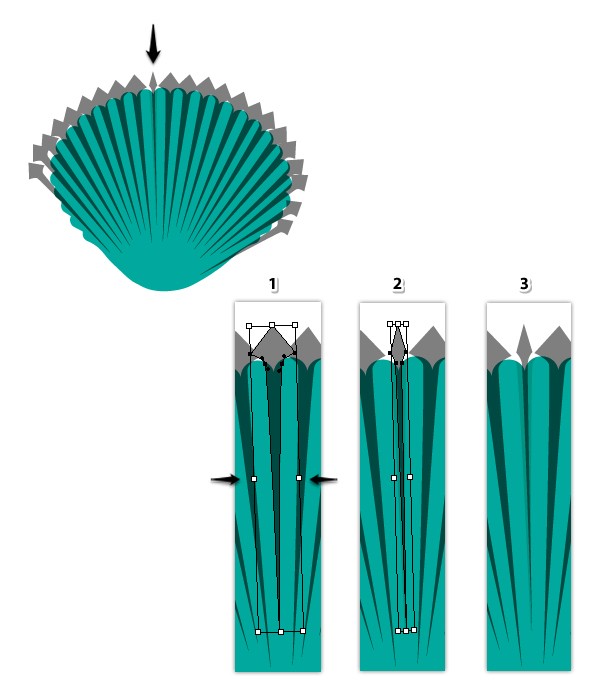
Step 8
Continue to squeeze the rest of the shapes. They must be in line with the original ones but thinner.
Step 9
Select black as the fill color for these thinner shapes then Group (Control-G) them. Copy and Paste in Front (Control-F) the seashell then select the group of shapes along with the copy of the seashell and press Intersect in the Pathfinder panel. Set the resulting shape to Blending mode Overlay and 50% Opacity. This is more of a deep shading compared with the first.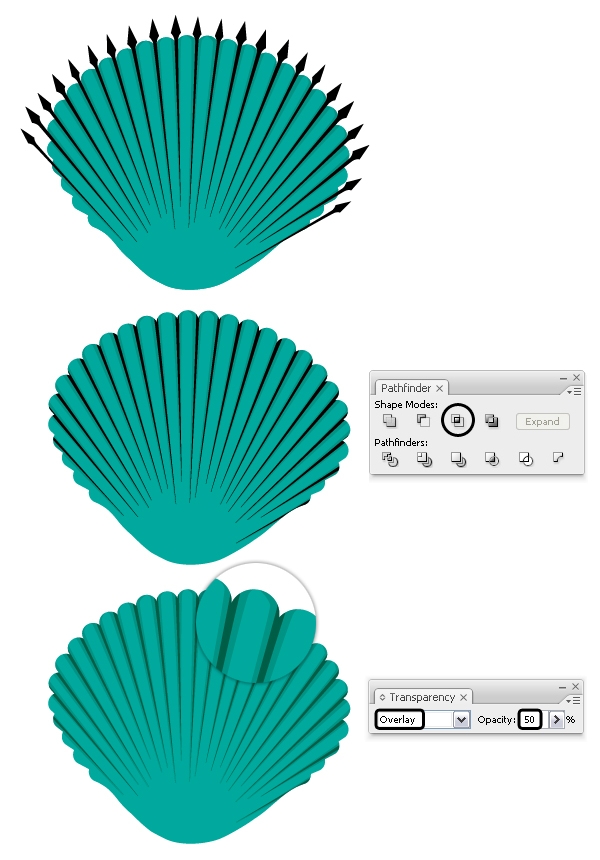
4. Add Highlights on the Seashell
Step 1
Grab the Pen Tool (P) or the Line Segment Tool (\) and draw a path through the middle of one of the “ribs” (1). Continue to draw other paths, one for each “rib” of the seashell (3).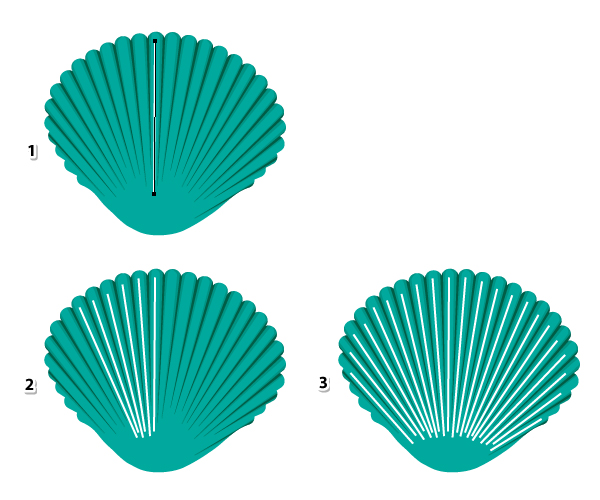
Step 2
Stroke all these paths with an Art Brush called “Tapered – Round” that you can find in Brush Libraries Menu > Artistic > Artistic_Ink. Still having these lines selected, go to the Appearance panel and double click on the brush stroke applied to open the Stroke Options window. Type 15% in the Width field and hit OK. Make sure that the tip of the brush is downwards otherwise check Flip Along also.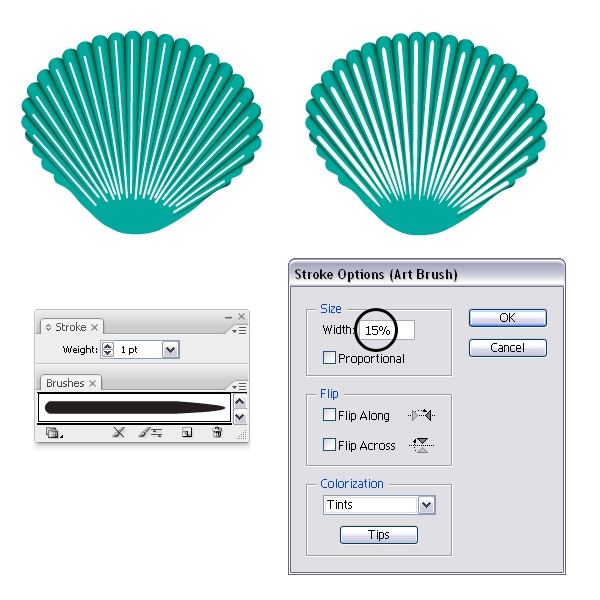
Step 3
You should decrease the width of the brush for the paths on the sides of the seashell. Keep the Width for the paths in the middle as it was set at the previous step, 15% (1). Select the next few paths then open the Stroke Options window and set the Width at 12% (2). Select the next paths and decrease the width a little more as you rich the sides of the seashell (3). For the remaining paths set the Width at 5-7%.
Step 4
While the stroked paths are selected, select Expand Appearance from the Object menu then Ungroup (Shift-Control-G) twice (1). Fill all resulting shapes with a white to black radial gradient (2) then set the Blending mode to Screen (black becomes transparent) and 50% Opacity. You can Group (Control-G) them at this point (3).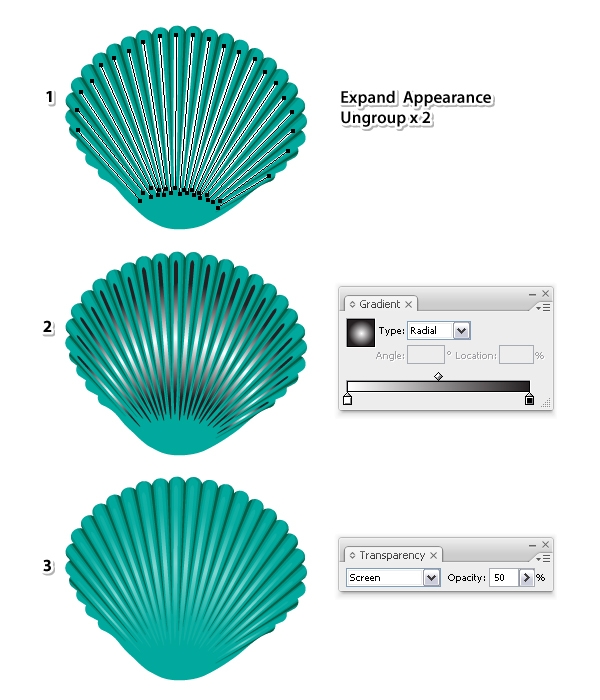
5. Color the Seashells and Add Shadows
Step 1
Select the shape of the seashell and replace the existing fill color with the radial gradient shown. Use the Gradient Tool (G) to change the radius.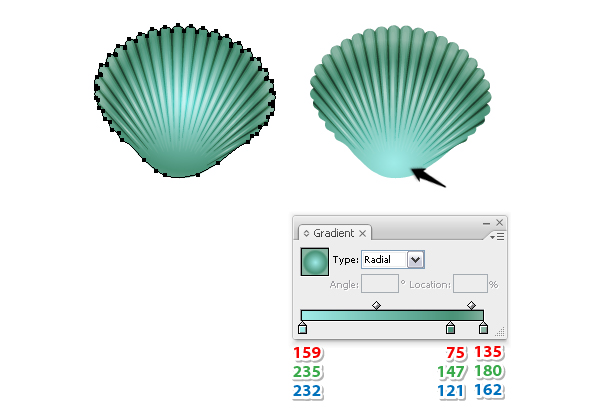
Step 2
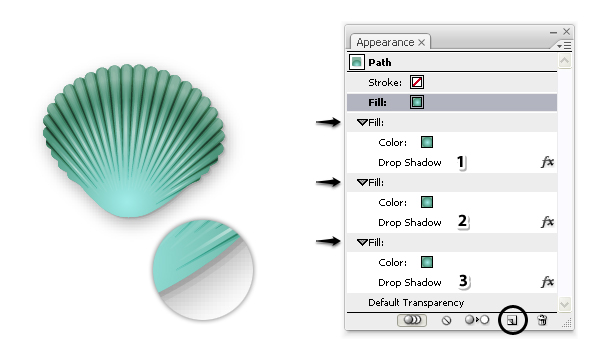
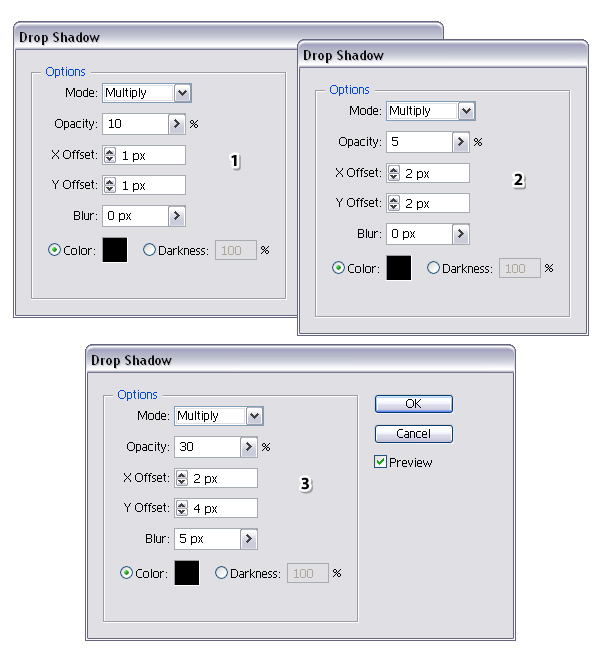
While the seashell stays selected, go to the Appearance panel and select the existing gradient fill then press the Duplicate selected items icon. Select the new fill from the bottom then go to Effect > Stylize and apply the Drop Shadow effect. You can see the settings that I’ve used below.Select this new fill (1) in the Appearance panel and press the Duplicate selected items icon again. You will get another fill at the bottom (2) and now, double click on the Drop Shadow effect to open the window and change the settings. Duplicate the fill one more time then open the Drop Shadow window again and change the settings (3).
Step 3
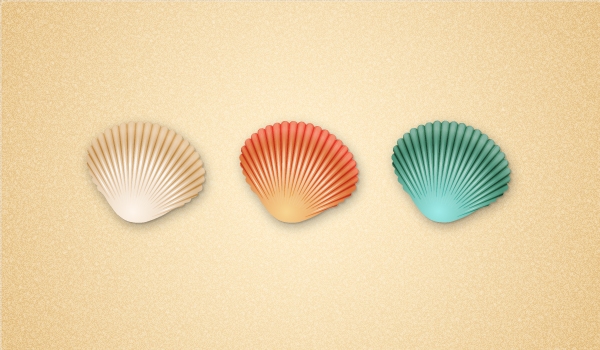
The green seashell is ready and now you can create more seashells of different colors. Make a copy of the first seashell then replace the existing green gradient with one using shades of orange. Because you are using brighter colors, you can increase the Opacity for the group of highlights from 50% to 70% (step 4.4).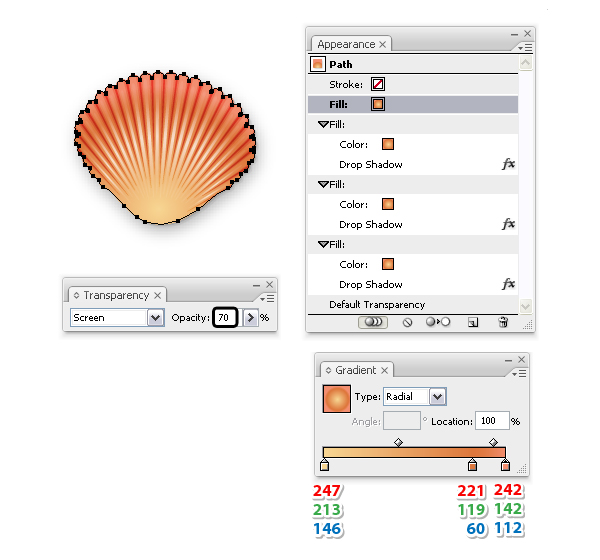
Step 4
Here is another version. Make one more copy of the first seashell then replace the existing gradient with the one shown below. The highlights are barely visible at this point since you are using lighter colors therefore increase the Opacity of the group from 50% to 90%.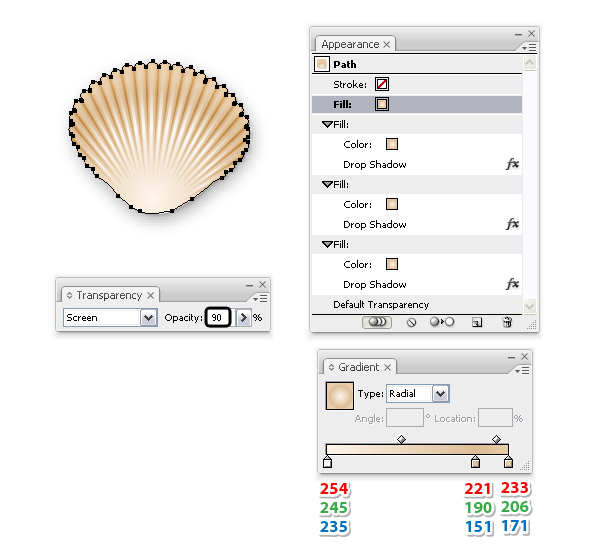
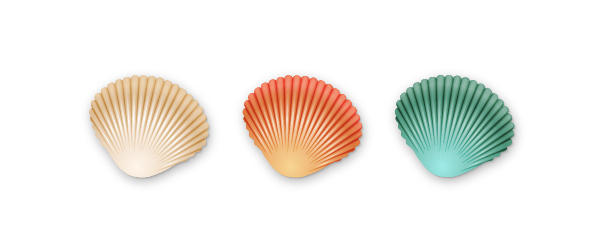
Step 5
You are finished are here are the three seashells that we have created.