free tutorial illustrator | Free Graphics Design Collection and Tutorials
Showing posts with label free tutorial illustrator. Show all posts

Quick Tip: Create a Simple Seashell in Adobe Illustrator

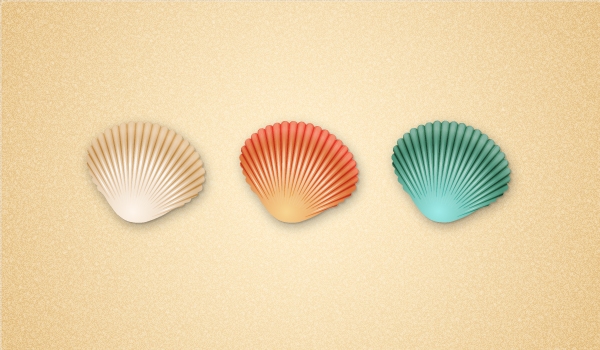
Final product image
What You'll Be Creating

In this new quick tip you will learn how to create a simple seashell in Adobe Illustrator.
You will begin with the shape of the seashell which is made using basic shapes, the Rotate option and the Pathfinder panel. To add more depth, you will add two types of shading and also highlights on the surface of the seashell.
At the end, you will color the seashells using different gradients and add the shadows. Let’s begin!
Launch Illustrator and go to File > New in order to open a blank document.
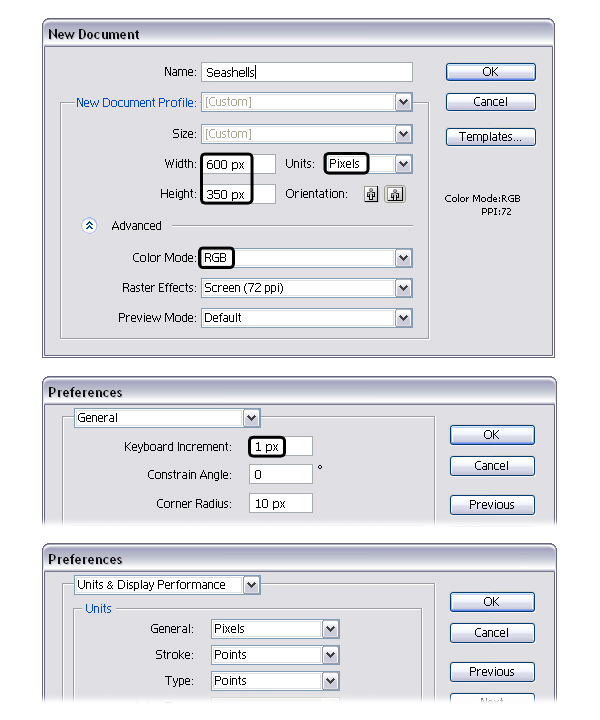
Type a name and set up the dimensions then select Pixels as Units and RGB as Color Mode. Next, go to Edit > Preferences > General and set the Keyboard Increment to 1px then go to Units & Display Performance and make sure that the Units are as indicated. I usually work with these settings and they will help you throughout the drawing process.
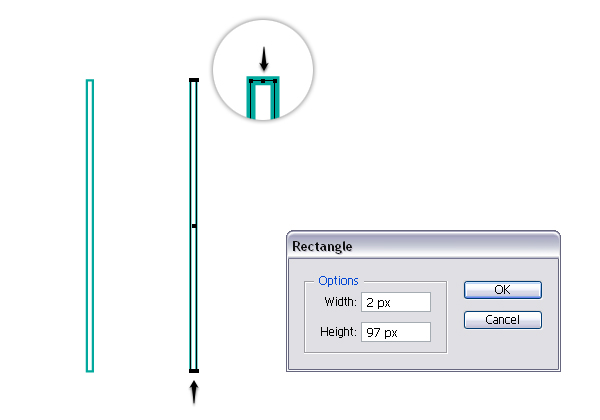
Grab the Rectangle Tool (M) and draw a 2 x 97px rectangle then give it a stroke using the color of your choice. Now, zoom on the top part of the rectangle then grab the Add Anchor Point Tool (+) and use it to add an extra point in the middle as shown in the close-up. Do the same thing at the bottom of the rectangle.
Use the Direct Selection Tool (A) to select only the point added earlier and move it upwards 4px by pressing the Up Arrow Key on your keyboard four times. Still having this point selected, press the Convert selected anchor points to smooth icon in the Control panel. Don’t forget about the bottom of the rectangle and repeat the same things.
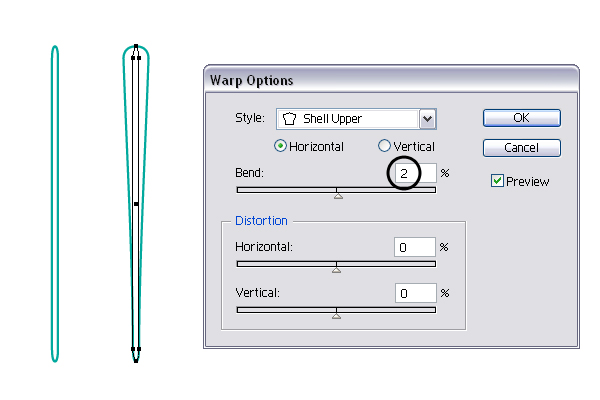
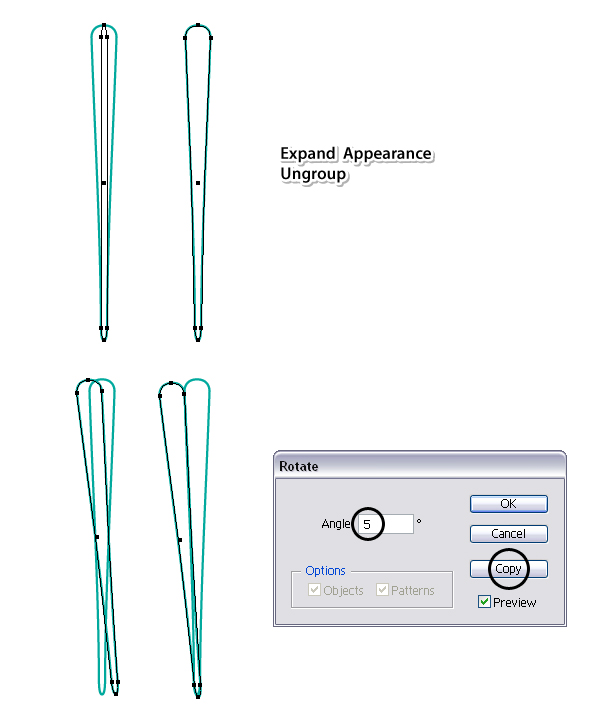
Having your rounded rectangle selected, go to Effect > Warp > Shell Upper. Apply a 2% Horizontal Bend and hit OK
In order to expand the effect that you have applied, go to Object menu and select Expand Appearance then Ungroup (Shift-Control-G). I will name the shape obtained “first-rib”. While this shape stays selected, go to Object > Transform > Rotate and select a 5 degrees Angle then hit Copy. You will get a second “rib” on top but you need to move it to the left a little, right next to the first.
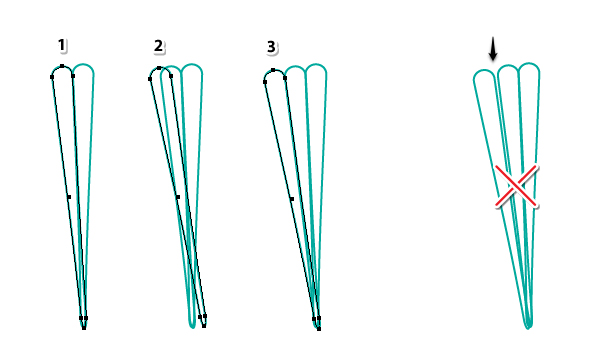
Now, select the second “rib” (1) then go to Object > Transform > Rotate, apply again a 5 degrees Angle and hit Copy. You will get the third “rib” (2) that you have to move in the right place, to the left and a little down (3). These ribs must be right next to each other even to overlap a bit but definitely without gaps between them.
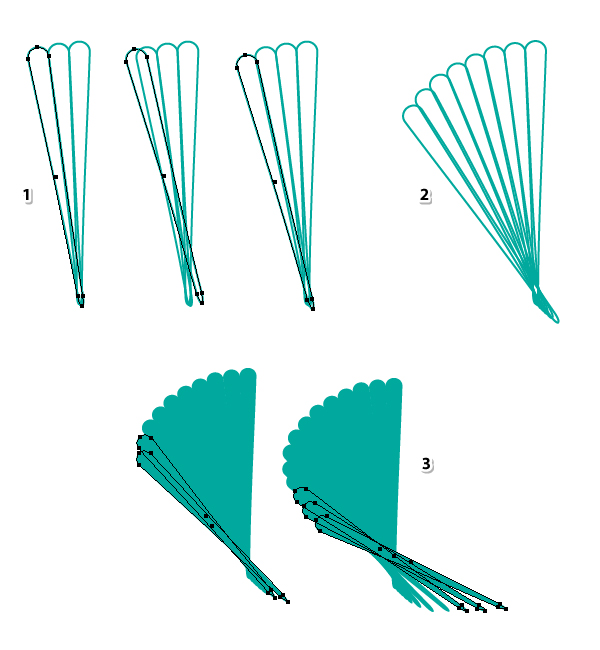
You get the point. Now, select the third “rib” and rotate it 5 degrees to get the next one (1). Move it to its place then continue to do the same thing (2). Once you get at the bottom, you can overlap the last few shapes in order to get smaller “ribs” (3). At this point I’ve switched to a green fill so you can see better the shape of the seashell coming together. Don’t worry about the bottom of the seashell because you will fix that later.
Now, select all the shapes from the left side and reflect them to the other side by going to Object > Transform > Reflect. Check Vertical and hit Copy. Make extra adjustments if needed.
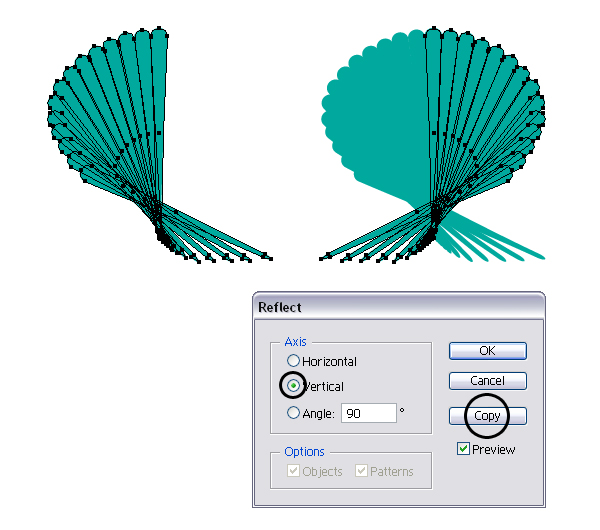
Next, select everything and press Add in the Pathfinder panel in order to get a single shape.
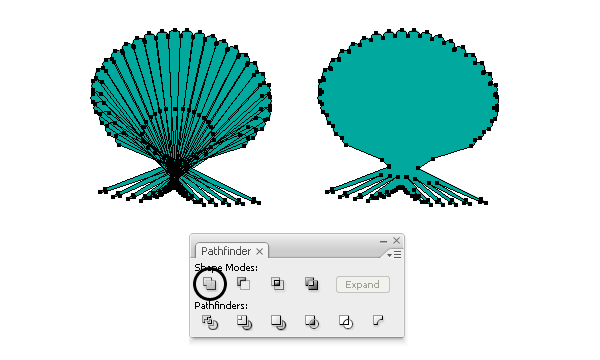
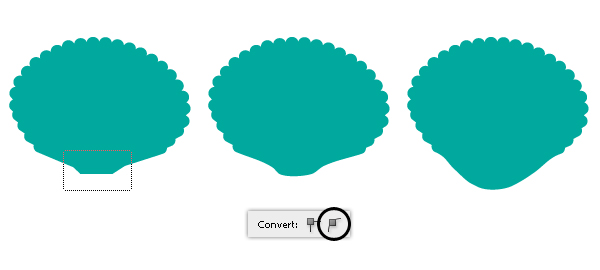
Grab the Pen Tool (P) or the Line Segment Tool (\) and draw a straight path as shown in the following image. Select the green shape and the line and press Divide in the Pathfinder panel then Ungroup (Shift-Control-G). Delete the shape at the bottom because you don’t need it.
Use the Direct Selection Tool (A) to drag a selection over the points at the bottom of the seashell and press the Convert selected anchor points to smooth icon in the Control panel. This will generate the handles and now you can move them downwards to create the rounded bottom. Now the shape of the seashell is ready.
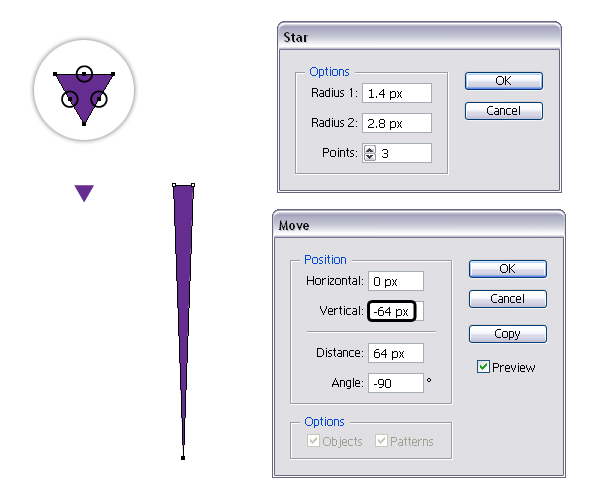
Grab the Star Tool and draw a small triangle then switch to the Delete Anchor Point Tool (-) and remove the three points indicated on its sides. Next, use the Direct Selection Tool (A) to select only the bottom point and go to Object > Transform > Move. There, type -64px in the Vertical field and hit OK.
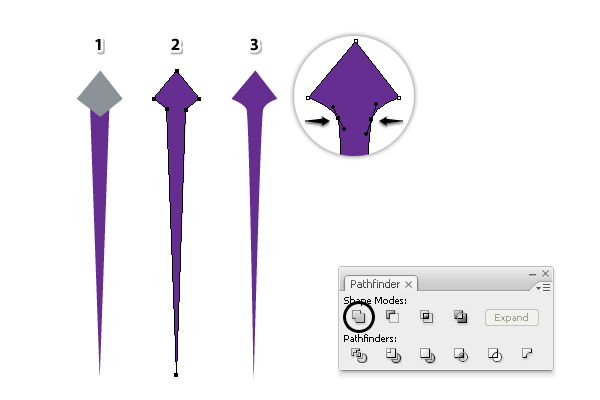
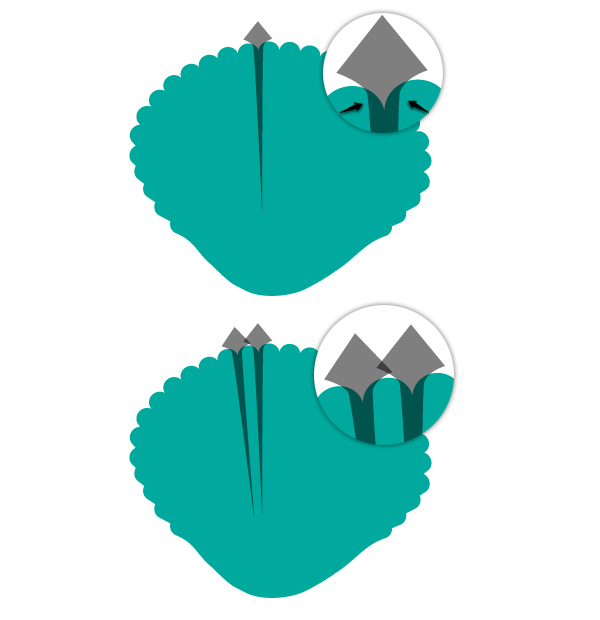
Now, take the Pen Tool (P) and draw a rhombus like shape at the top as in the next image (1). Select both shapes and press Add in the Pathfinder panel in order to create a single shape (2). Use the Convert Anchor Point Tool (Shift-C) to transform the two inner points indicated in the close-up from corner to smooth (3). You need that area to be rounded but everything will make sense in the following steps. I will name this shape “light-shading-shape”.
Move the shape that you have obtained at the previous step over the seashell and arrange it right between the “ribs”. The rounded area that I’ve talked about earlier should partially cover the top part of the “ribs” as in the close-up. I’ve set the Opacity of the light-shading-shape to 50% so you can see exactly where they overlap but you don’t have to, it’s just for visual purposes.
Next, make a copy of this shape then rotate slightly and arrange it between the next two “ribs”.
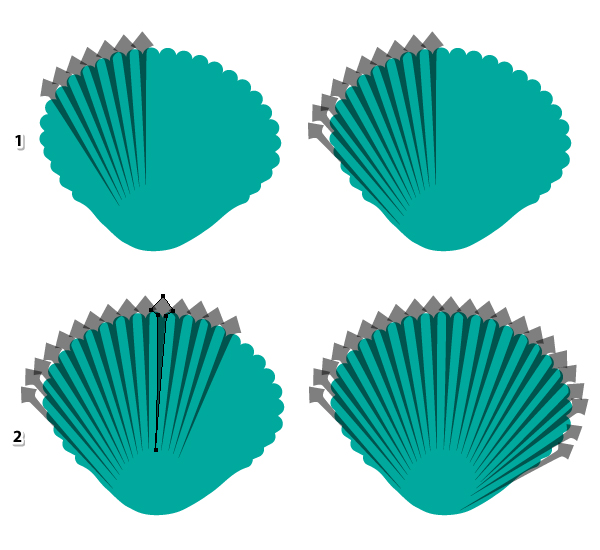
Continue to make more copies of the light-shading-shape, rotate accordingly and arrange them between the “ribs”. After the left side of the seashell is done (1) you can do the same thing on the right side (2).
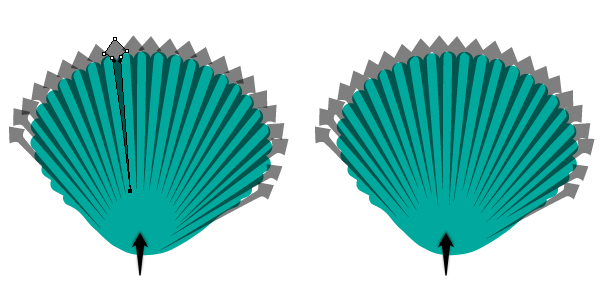
At this point, use the Direct Selection Tool (A) to select the end point of one of the shapes and you can make it a little shorter or a little longer. Repeat with the rest. The goal here is that the light-shading-shapes to have different lengths at the bottom. 
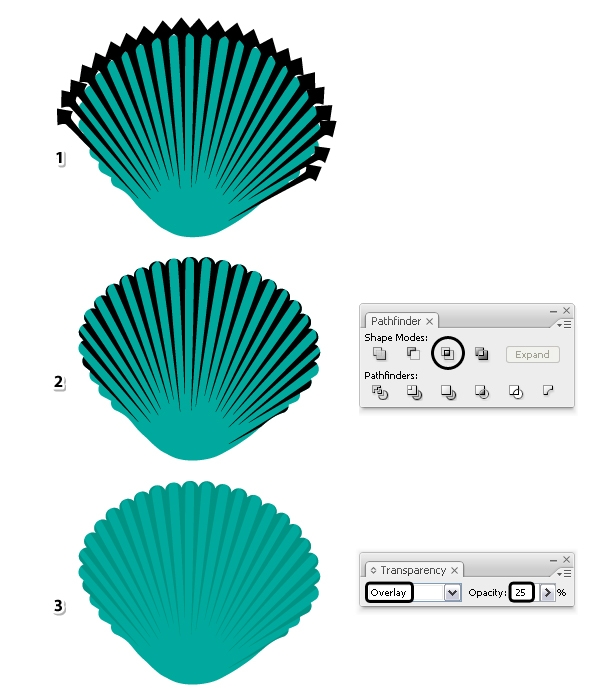
The Opacity is set back to 100% now. Copy and Paste in Front (Control-F) the seashell then select all light-shading-shapes and Group (Control-G) them (1). Before you continue make a copy of this group because you will need it at the next step. Now, select the group of shapes along with the copy of the seashell and press Intersect in the Pathfinder panel (2). Set the resulting shape to Blending mode Overlay and 25% Opacity while having a black fill (3).
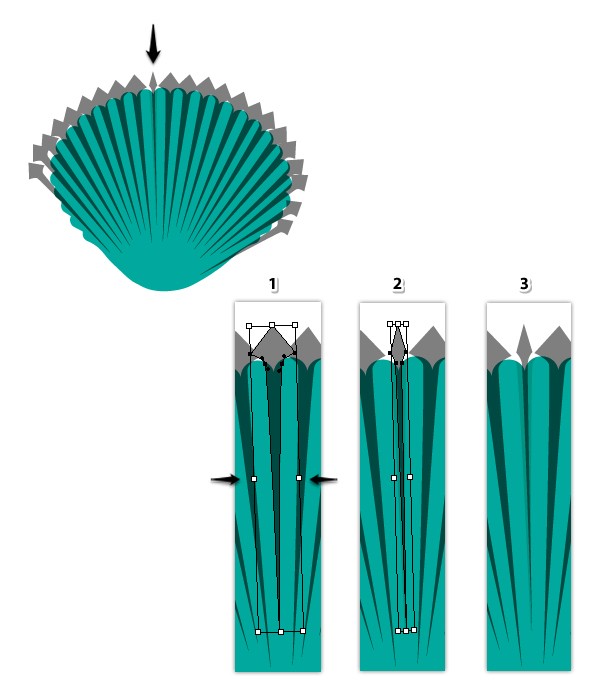
The light shading is done but we need more depth. Grab the copy of the group that you’ve made at the previous step and move it in front of everything. Ungroup (Shift-Control-G) them first then select one of the shapes with the Selection Tool (1) and make it thinner by squeezing the bounding box (2). You can see the end result in the third close-up.
Continue to squeeze the rest of the shapes. They must be in line with the original ones but thinner.
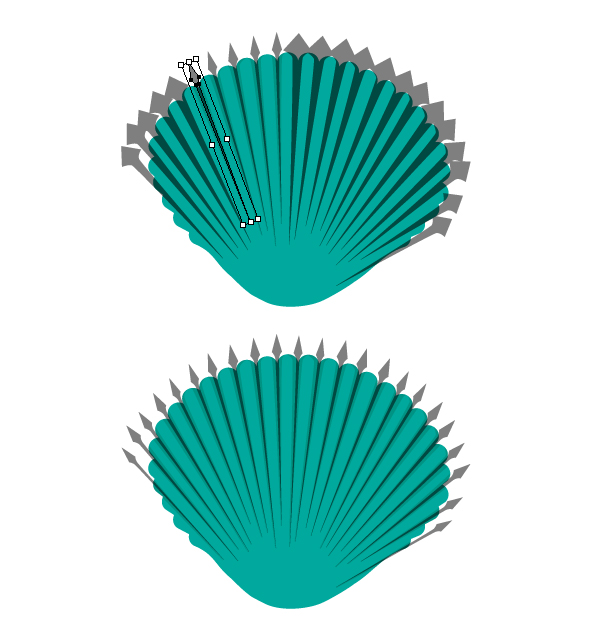
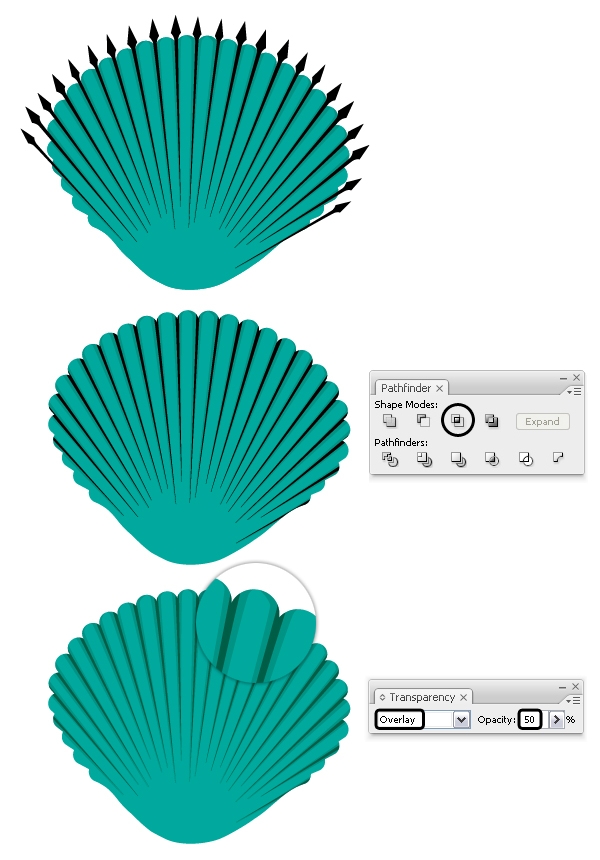
Select black as the fill color for these thinner shapes then Group (Control-G) them. Copy and Paste in Front (Control-F) the seashell then select the group of shapes along with the copy of the seashell and press Intersect in the Pathfinder panel. Set the resulting shape to Blending mode Overlay and 50% Opacity. This is more of a deep shading compared with the first.
Grab the Pen Tool (P) or the Line Segment Tool (\) and draw a path through the middle of one of the “ribs” (1). Continue to draw other paths, one for each “rib” of the seashell (3).
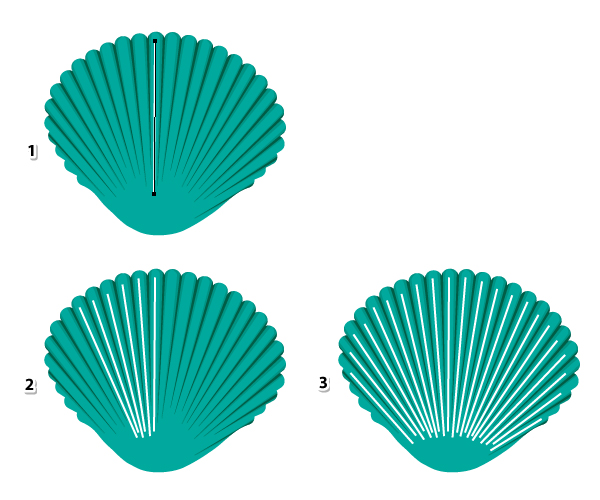
Stroke all these paths with an Art Brush called “Tapered – Round” that you can find in Brush Libraries Menu > Artistic > Artistic_Ink. Still having these lines selected, go to the Appearance panel and double click on the brush stroke applied to open the Stroke Options window. Type 15% in the Width field and hit OK. Make sure that the tip of the brush is downwards otherwise check Flip Along also.
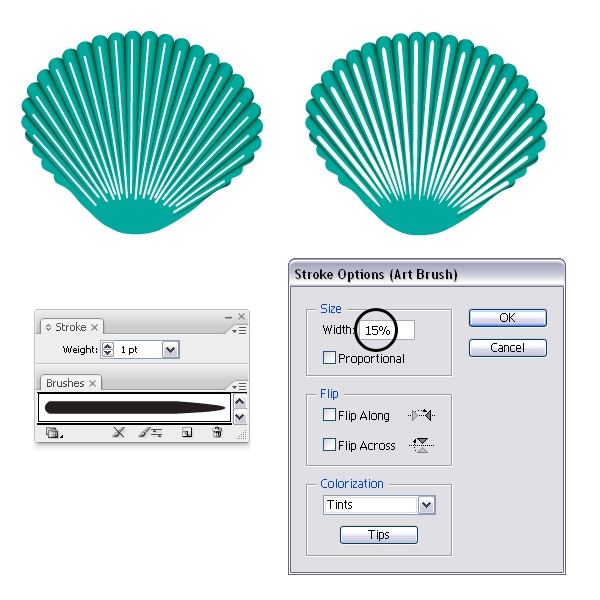
You should decrease the width of the brush for the paths on the sides of the seashell. Keep the Width for the paths in the middle as it was set at the previous step, 15% (1). Select the next few paths then open the Stroke Options window and set the Width at 12% (2). Select the next paths and decrease the width a little more as you rich the sides of the seashell (3). For the remaining paths set the Width at 5-7%.
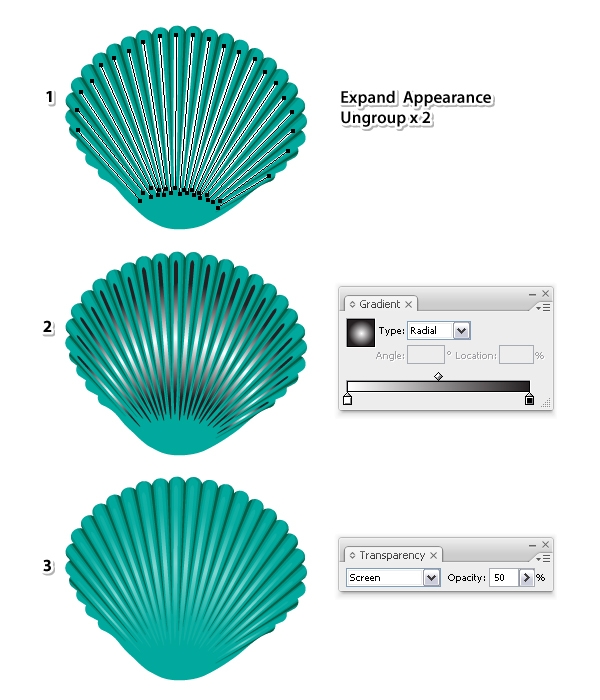
While the stroked paths are selected, select Expand Appearance from the Object menu then Ungroup (Shift-Control-G) twice (1). Fill all resulting shapes with a white to black radial gradient (2) then set the Blending mode to Screen (black becomes transparent) and 50% Opacity. You can Group (Control-G) them at this point (3).
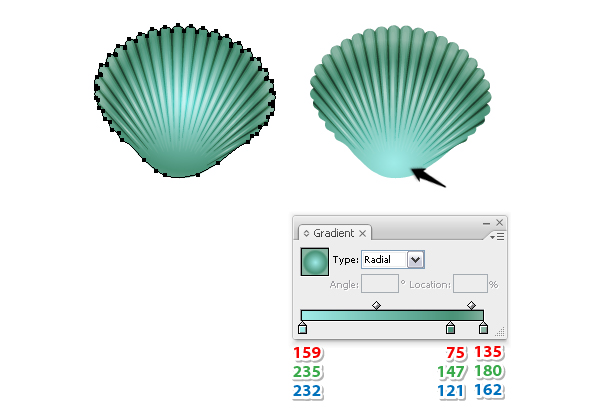
Select the shape of the seashell and replace the existing fill color with the radial gradient shown. Use the Gradient Tool (G) to change the radius.
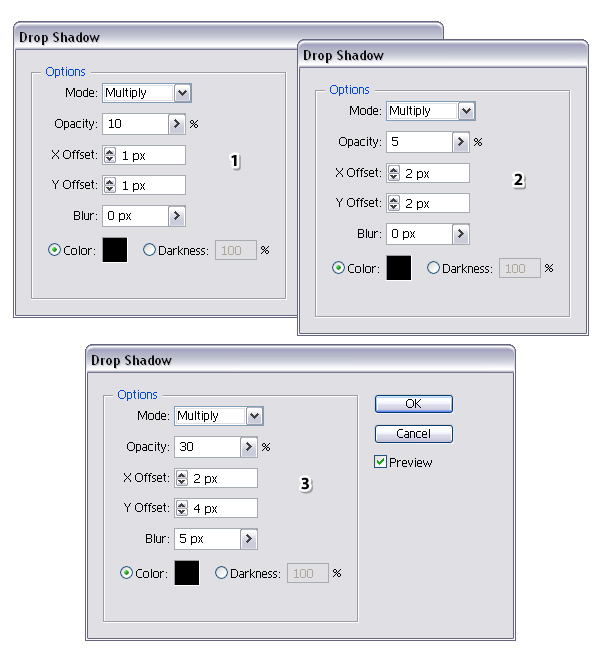
While the seashell stays selected, go to the Appearance panel and select the existing gradient fill then press the Duplicate selected items icon. Select the new fill from the bottom then go to Effect > Stylize and apply the Drop Shadow effect. You can see the settings that I’ve used below.
Select this new fill (1) in the Appearance panel and press the Duplicate selected items icon again. You will get another fill at the bottom (2) and now, double click on the Drop Shadow effect to open the window and change the settings. Duplicate the fill one more time then open the Drop Shadow window again and change the settings (3).
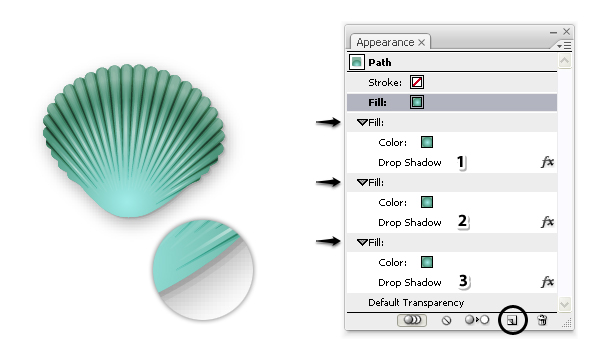
These are the Drop Shadow settings that I’ve used for the three fill attributes.
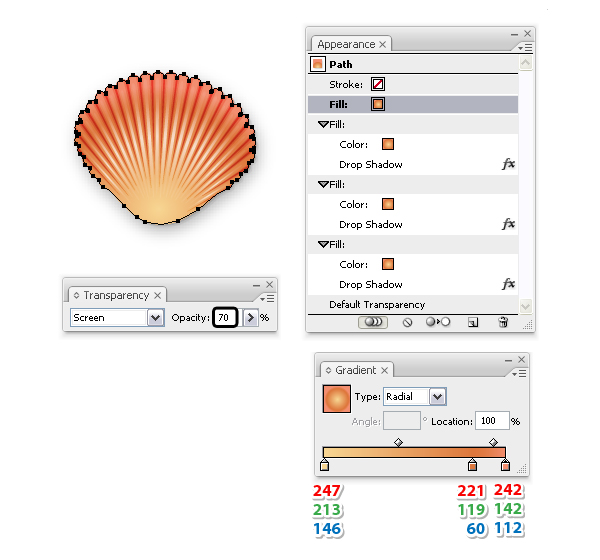
The green seashell is ready and now you can create more seashells of different colors. Make a copy of the first seashell then replace the existing green gradient with one using shades of orange. Because you are using brighter colors, you can increase the Opacity for the group of highlights from 50% to 70% (step 4.4). 
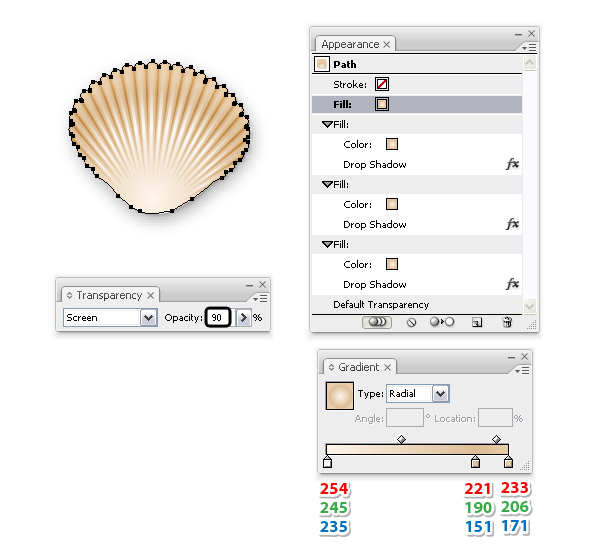
Here is another version. Make one more copy of the first seashell then replace the existing gradient with the one shown below. The highlights are barely visible at this point since you are using lighter colors therefore increase the Opacity of the group from 50% to 90%.
Advertisement
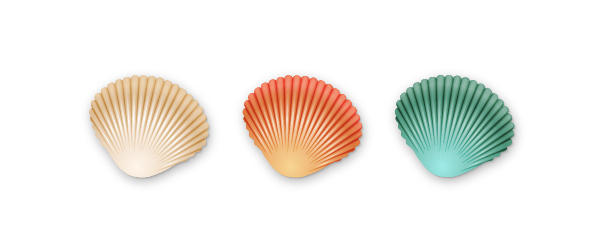
You are finished are here are the three seashells that we have created.
I hope you have found this quick tip useful. You can use these seashells in your illustrations this summer and if you decide to make them, please share your version with us. I would love to see other colors.

Create an Advanced Frozen Vector Portrait in Adobe Illustrator

 Create an Advanced Frozen Vector Portrait in Adobe IllustratorWhat You'll Be Creating

My new course, Advanced Vector Portraits was recently published. It's a follow on course from my first, Vector Portraits for Beginners and it shows you how to create detailed hair, skin shading, modified portraits and more. A perfect jumping board for exploring how to create style vector portraits which look different from their original stock image.

1. Modify Your Stock Image

As with all of my vector portraits, I start with an initial base image. Depending on the project you're taking on, you may need to carbon copy your stock image or you may be able to get creative. Advanced Vector Portraits focuses on the latter and shows you quick and simple ways to modify your reference image before you even start the vectoring process.
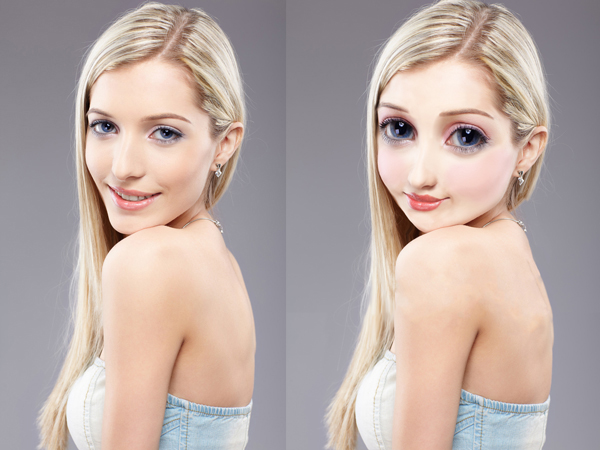
So following the more advanced route of modifying a stock image, I started with a great image from Photodune of a young blond woman. The character I'm wishing to inspire this portrait is Elsa from Frozen. She's young and she's blond... so I'm already half way there in terms of reference material in front of me. However the stock image is realistic, and Disney proportions aren't. They're a cartoon and I need to turn our blond woman into a big eyed, round faced beauty.

Create an Advanced Frozen Vector Portrait in Adobe Illustrator
In the course, I'll show you how to create a very similar effect to this. Modifying the eyes, the face shape and lips to create this very rough looking reference image. 
Now it doesn't need to be polished or perfect, it's only a reference and as long as you can still clearly see the features you need, we can work on this in vector.

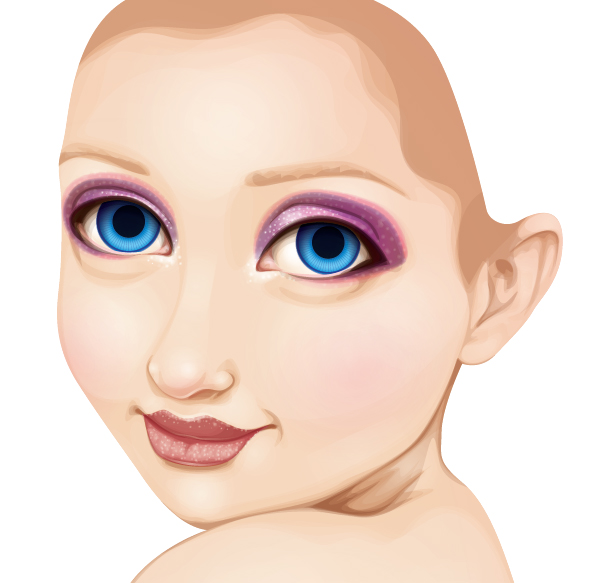
2. It All Starts With Skin Shading

Step 1

When you're creating a detailed vector portrait, one of the most challenging elements to create is skin shading. It's a thankless job I'm afraid. It doesn't have the impact of the eyes, hair or lips. You'll know you're doing the skin shading right when people don't comment on it. 
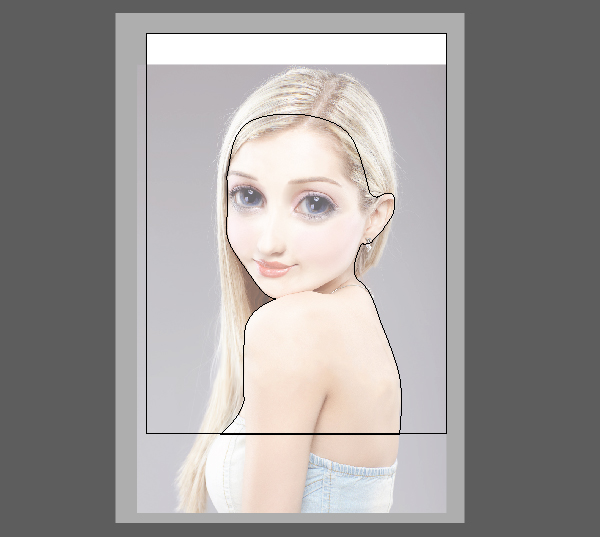
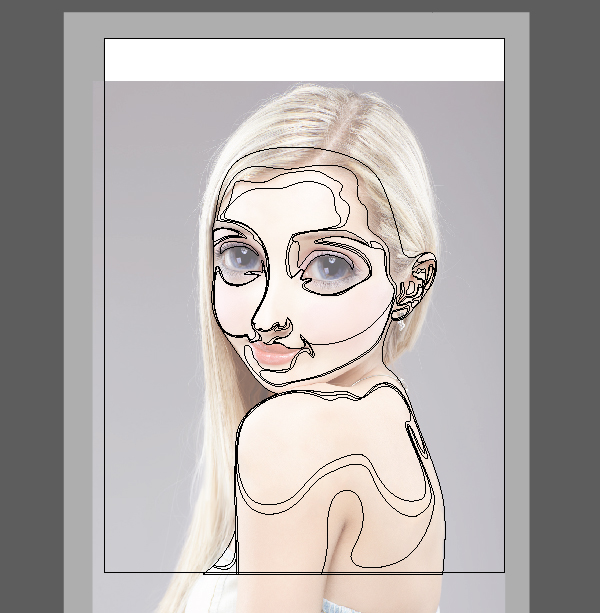
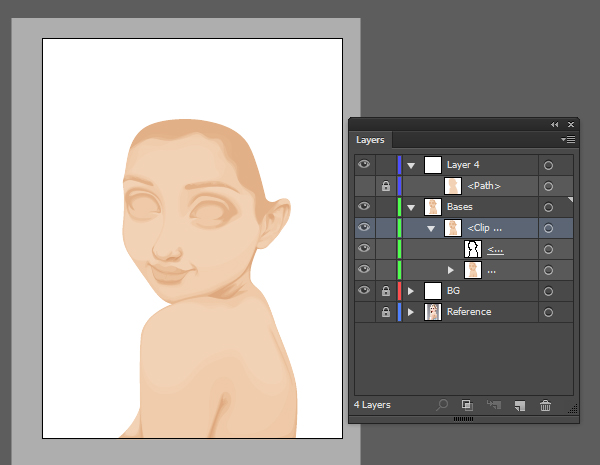
So first let's create our all important base shape with the Pen Tool (P) in Adobe Illustrator. This is going to be used to create a Clipping Mask (Control-7) and to provide a solid base to put many low Opacity shapes on top. 

Create an Advanced Frozen Vector Portrait in Adobe Illustrator

Step 2

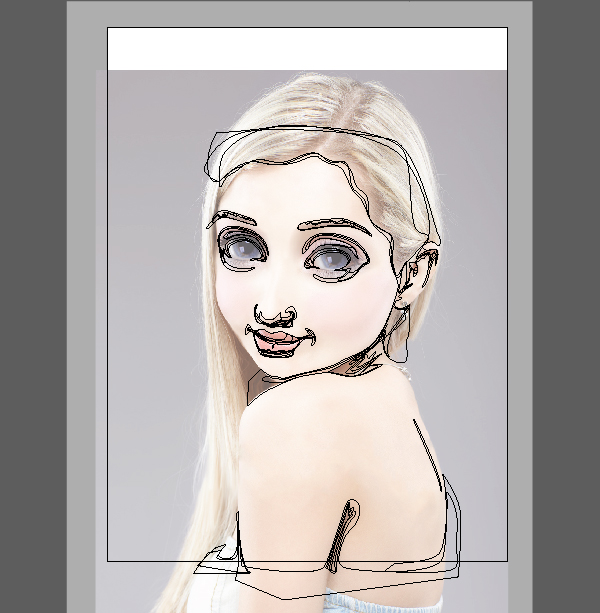
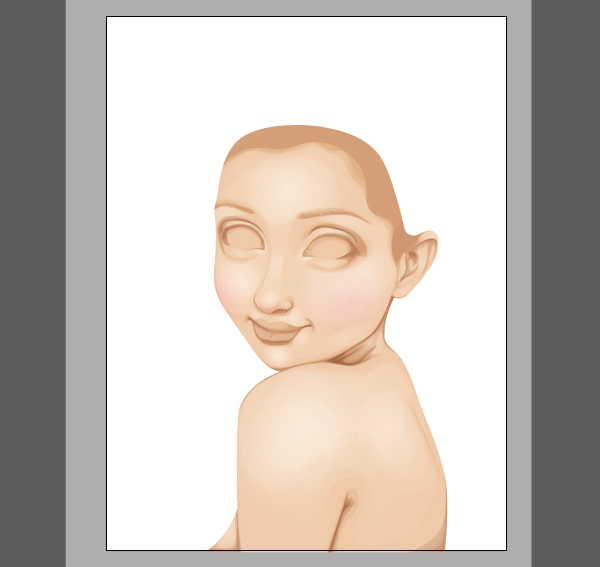
For the initial skin shading shapes, I use Pathfinder > Minus Front to remove the lighter areas of the face from duplicates of the base shape. I then stack multiple variations of the shapes with low Opacities on top of the base to create a smooth transition of colour.
The skintones I tend to use can be found directly in Adobe Illustrator by going in the Swatches panel and into the drill down menu. Select Open Swatch Libraries > Skintones and you'll be presented with many palettes of varied ethnicity. I tend to select several so I can create the lightest of light and darkest of dark contrasts in the skin.
In my course I'll show you each shape that I draw for a manipulated portrait such as this and tell you further about the colours I use. 

Create an Advanced Frozen Vector Portrait in Adobe Illustrator

Step 3

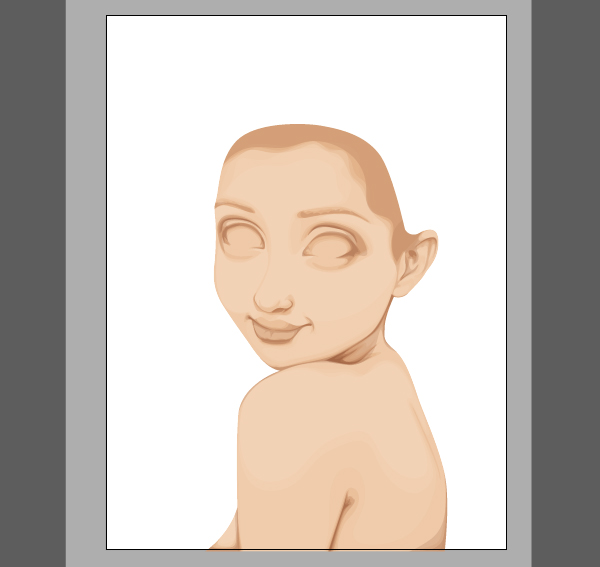
The smaller the shapes I draw, the deeper the contrast. I always work on the shadowed areas first and use several Blending Modes with the original base shape colour to keep an even skin tone in the initial stages. 

Create an Advanced Frozen Vector Portrait in Adobe Illustrator

Step 4

Once the initial shapes are drawn, I then Group them (Control-G) and use a duplicate of the base shape to create a Clipping Mask (Control-7). This helps clean up the edges

Create an Advanced Frozen Vector Portrait in Adobe Illustrator

Step 5

I then to continue to add dark shadow shapes to the skin and then Group them and place them in the clipping mask group.

Create an Advanced Frozen Vector Portrait in Adobe Illustrator

Step 6

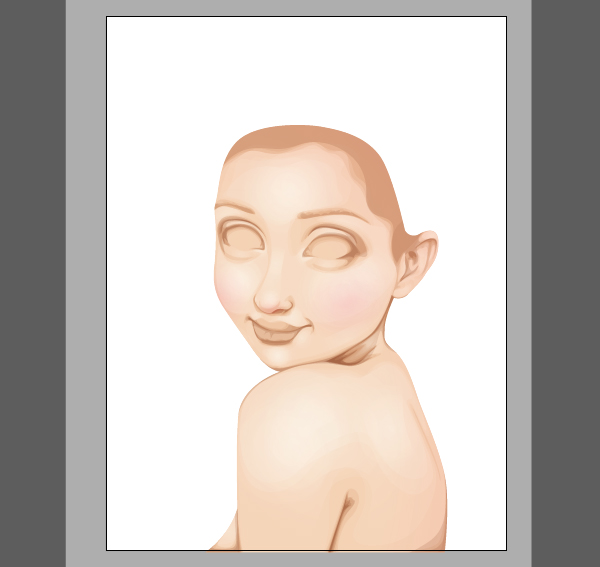
The next step is to add highlights to the skin (usually with transparent Radial Gradients) and variations in the skin tones. Variations such as rosey cheeks, slight greying in the corner of the eyes and a little touch of red on the nose. 

Create an Advanced Frozen Vector Portrait in Adobe Illustrator
Then I lighten the skin further and add more rosey tones to the skin (given Elsa is a fan of the cold) to create a more icy look.

Create an Advanced Frozen Vector Portrait in Adobe Illustrator

3. Let's Work on those Lips

Step 1

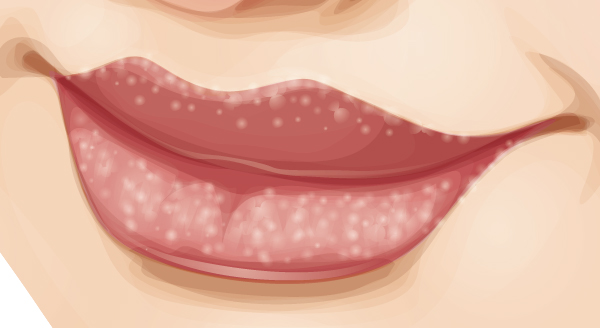
The majority of shading should always be done with the skin shading. This is because the lips are part of the skin. Any additional detailing you add to the lips, such as colours, sparkles etc... should be done separately so they don't make the lips look as if they're floating on the surface of the skin.
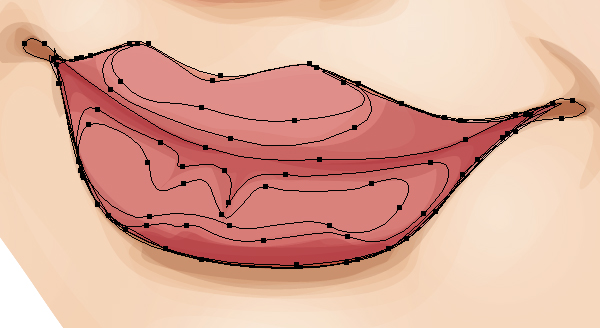
I first begin with adding colour to the lips to create a base. I'll avoid adding too much colour to the areas where the light catches them.

Create an Advanced Frozen Vector Portrait in Adobe Illustrator

Step 2

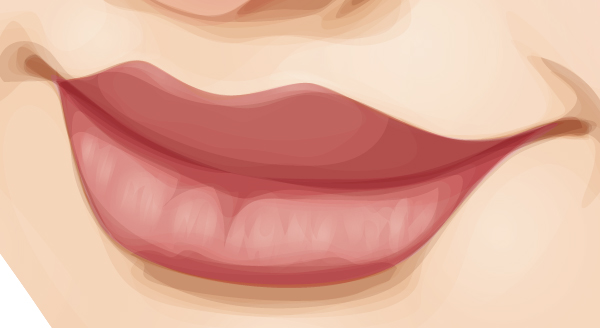
Then using the same process of adding highlights to the skin, I use transparent Radial Gradients to the lips to add highlights and textures. 

Step 3

Finally, sparkles and glitter are added to the lips to create a more frosted look.

4. Create Striking Eyes

Step 1

In a portrait, the first thing we pay attention to is the eyes. This is your first impression with the viewer, so make it count and create striking eyes. In this design it helps that the eyes have been enlarged, it's just I'll need to make them striking enough!
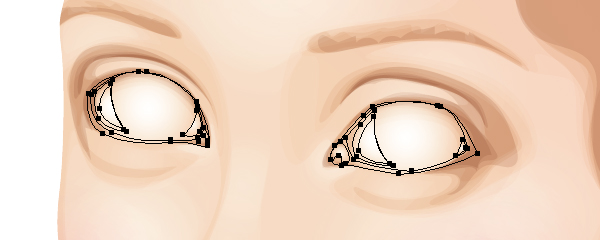
Using pale transparent Radial Gradients, I first create shapes for the eyeball and corners of the eyes. 

Create an Advanced Frozen Vector Portrait in Adobe Illustrator

Step 2

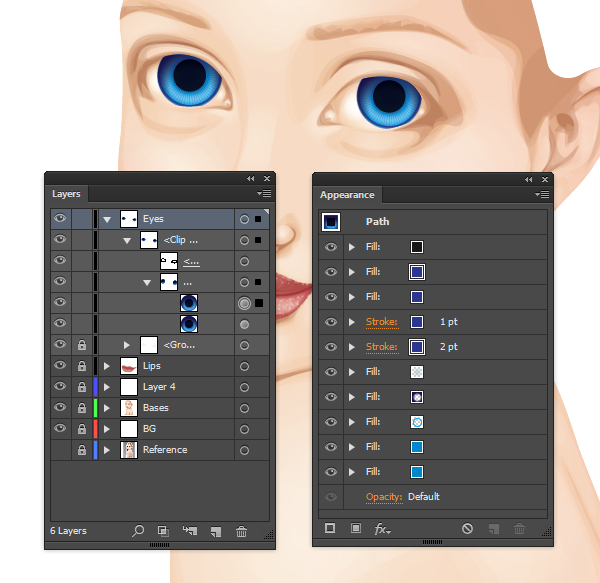
One of the cleanest ways to create a detailed iris and pupil is to use the Appearance panel and Graphic Styles. It also means you can create two evenly styled eyes!
I've used a series of blues with varying Offset Paths and then finished it off with a Zig Zag effect. In the course, I will show you how to create this fill by fill.
Once the eyes are created, place them in a Clipping Mask to keep the edges tidy.

Step 3

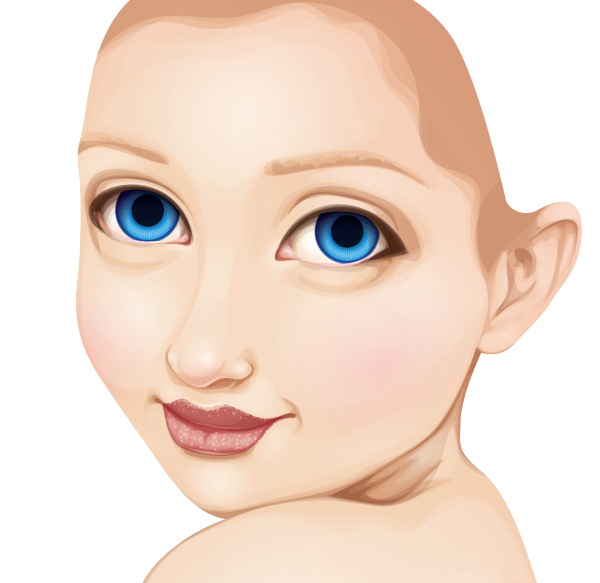
Now that we have our eyes, we need to darken the skin around the eyes to help create a natural lash line. These shapes can also be drawn to help add shading to the eyeball and create a more 3D effect.

Create an Advanced Frozen Vector Portrait in Adobe Illustrator

Step 4

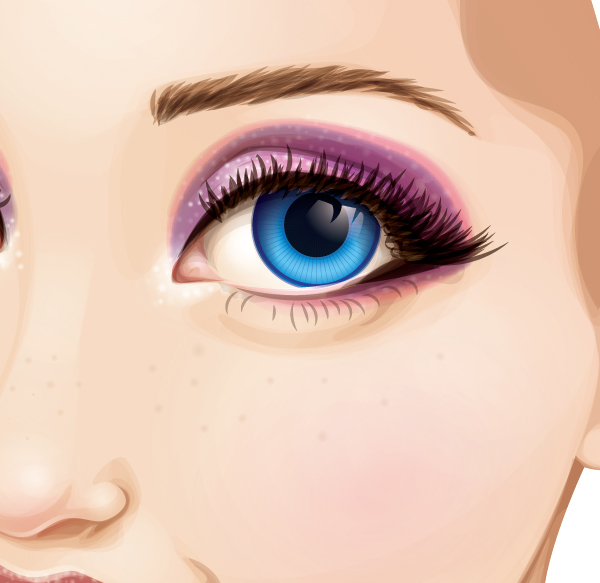
Let's add some colours to the eyes by rendering some eye shadow and liner. Using transparent Radial Gradients, I've added purple around the eyes and then added dots to create a glitter effect. 

Create an Advanced Frozen Vector Portrait in Adobe Illustrator

Step 5

To finish off the eyes, I'm going to use one of my favourite art brushes, which has been taught in both of my vector courses (remember the beginners course is for free!). 
First I add eyelashes and then move onto adding eyebrows. She's looking much more normal now! Finally I add a reflection of light in the eyes using another gradient.
I take this time to also add some freckles on the nose and cheeks. 

Create an Advanced Frozen Vector Portrait in Adobe Illustrator

5. Create a Braided Hairstyle

Step 1

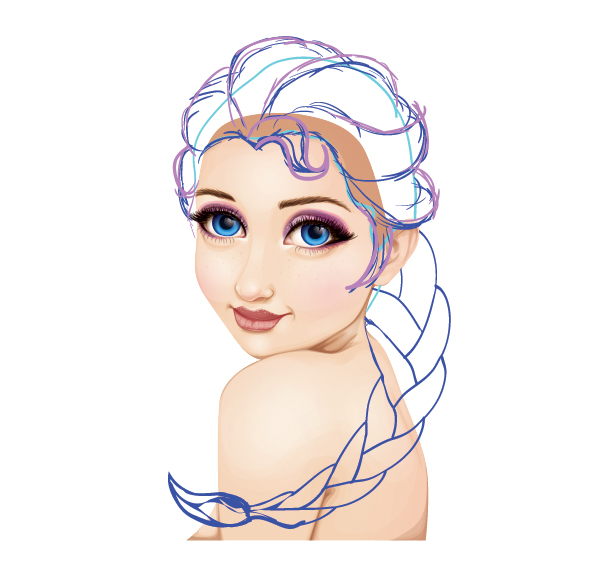
In Advanced Vector Portraits, I'll teach you some solid hair style theory. How to build your own hair styles and make them look detailed! This is a variation of what I'll be teaching you, so you know how to add a braid into your design.
Braids (or plaits in the UK!) are hard to draw, especially if you rarely add them to your design. Sadly, Elsa's hair style includes a big, thick, blonde braid.
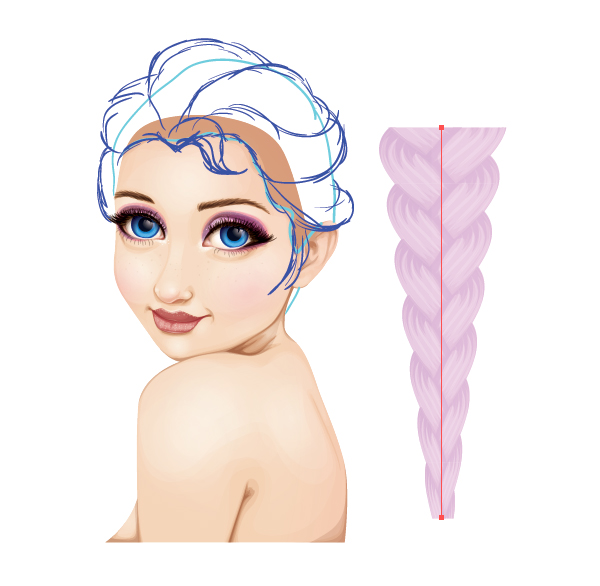
After you've sketched the top of your hairstyle on the skull, we're going to use a braid Art Brush to create a template for the braid. You can find out how to create your own braid brush via one of my old tutorials.

Create an Advanced Frozen Vector Portrait in Adobe Illustrator

Step 2

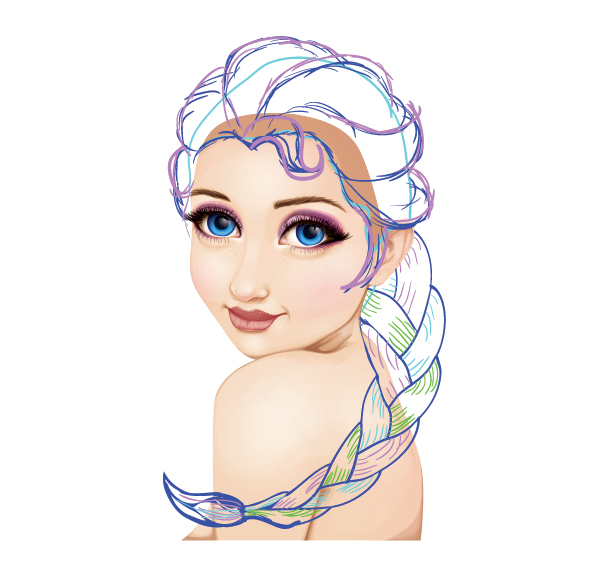
Once you've sketched around the brush, use a the Bend Warp effect to create a curve in your design. This will give the perfect swishing braid for your portrait.

Step 3

Give yourself some direction of the grain of the hair in the plait by drawing in some strands. Give each section of the braid (there are three) their own colour. This will help you see where each of the sections are. 

Create an Advanced Frozen Vector Portrait in Adobe Illustrator

Step 4

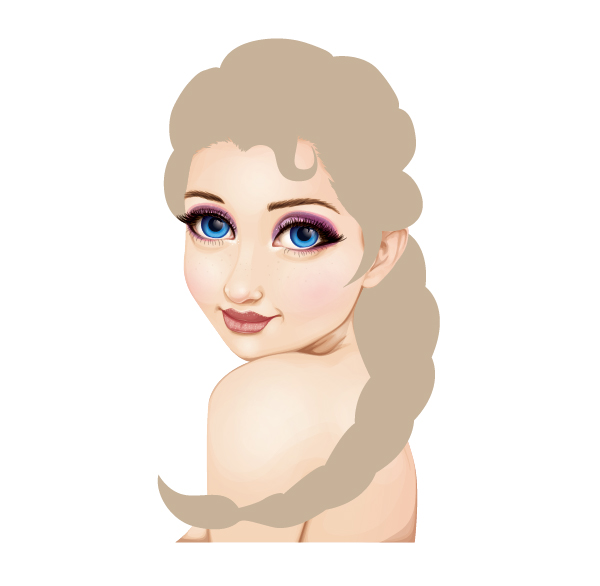
Once you've got your initial sketches laid, it's time to create those all important base shapes. I've created one for the hair on top and one for the braid.

Create an Advanced Frozen Vector Portrait in Adobe Illustrator

Step 5

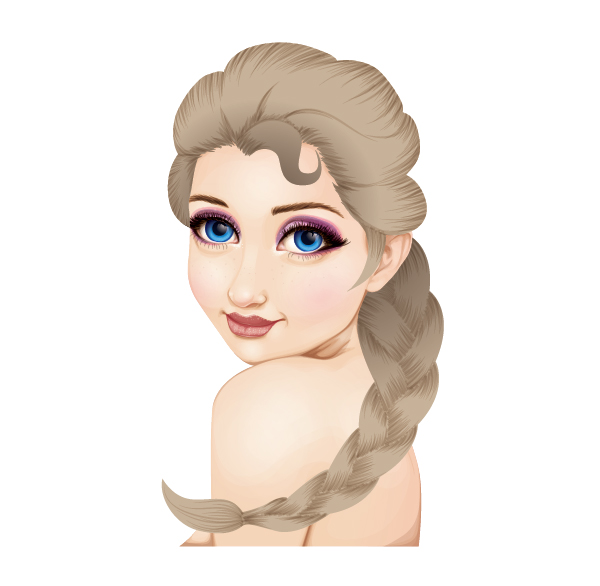
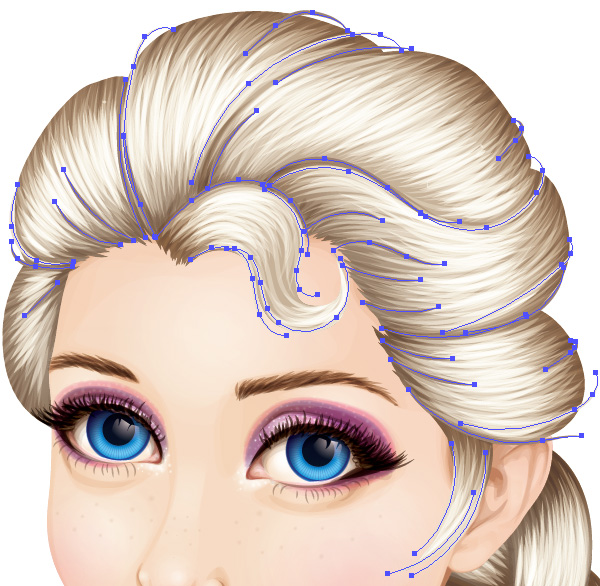
The detailing of the hair begins with adding gradients to the bases and then adding initial strokes to the hair. These strokes follow the sketch you've done, so you're aware of where each of the sections of hair are. The sketch you've made of the direction of hair on the braid will help a great deal.

Step 6

Keep adding the light and dark strands to the hair to create a nice glossy hair style. Finish off the hair by adding individual hairs which will help give a more realistic look to the hair. 
In the course, I will show you how to render the hair in detail and you'll see every stroke I draw.

Create an Advanced Frozen Vector Portrait in Adobe Illustrator

Want to Learn More?

This portrait used exactly the same processes I use in Advanced Vector Portraits. In the course you'll learn how to create two different styles of portrait, using the same stock image!
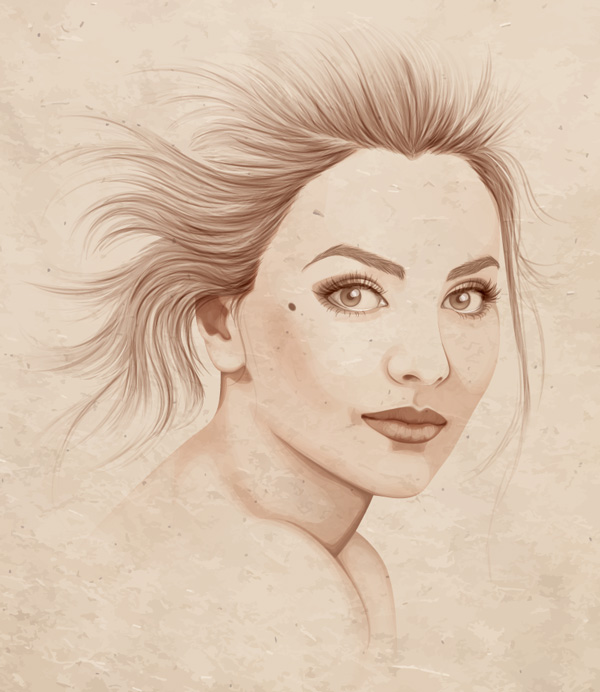
The first is a monochrome portrait using detailed yet minimal shading.

Create an Advanced Frozen Vector Portrait in Adobe Illustrator
The second is a more detailed portrait which follows exactly the same process as this Frozen portrait, but in much more detail. I'll talk you through each shape and stroke to create your own manipulated reference image and then vectoring the actual portrait.

Both portrait projects use exactly the same starting stock image! So what are you waiting for?

 
Powered by Blogger.